Hands on Flask
Last updated
Dec 15, 2022
Edit Source
# Hands on Flask: step by step
I am a newcomer of Flask. So I follow the official tutorial to build a blog post web application step by step.
# Reference
Flask Installation
Flask Tutorial
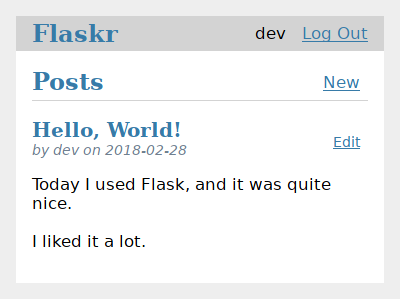
Follow the tutorial to build a blog web app like:
# Step by Step
# Step 0.Backgroud
build a basic blog application called Flaskr using Flask.
# Step 1. Project Layout
# Create a project directory
1
2
| mkdir flask-tutorial
cd flask-tutorial/
|
# Install Flask
Flask Installation Doc
Create an python environment using
venv:
 1
 2
 3
 4
 5
 6
 7
 8
 9
10
11
12
13
14
15
16
17
18
19
20
21
22
23
24
25
26
27
28
29
30
31
32
33
34
35
36
37
| $ python3 -m venv venv
$ tree . -L 3
.
└── venv
├── bin
│ ├── Activate.ps1
│ ├── activate
│ ├── activate.csh
│ ├── activate.fish
│ ├── pip
│ ├── pip3
│ ├── pip3.9
│ ├── python -> python3
│ ├── python3 -> /Users/yangls06/opt/miniconda3/bin/python3
│ └── python3.9 -> python3
├── include
├── lib
│ └── python3.9
└── pyvenv.cfg
5 directories, 11 files
$ tree venv/lib/python3.9/ -L 3
venv/lib/python3.9/
└── site-packages
├── _distutils_hack
│ ├── __init__.py
│ ├── __pycache__
│ └── override.py
├── distutils-precedence.pth
├── pip
│ ├── __init__.py
│ ├── __main__.py
...
├── pkg_resources
...
|
Activate the environment
Then the environment has been changed.

Install Flask
Within the activated environment, install Flask using pip:
 1
 2
 3
 4
 5
 6
 7
 8
 9
10
11
| $ pip install Flask
Looking in indexes: https://pypi.douban.com/simple
Collecting Flask
Downloading https://pypi.doubanio.com/packages/0f/43/15f4f9ab225b0b25352412e8daa3d0e3d135fcf5e127070c74c3632c8b4c/Flask-2.2.2-py3-none-any.whl (101 kB)
━━━━━━━━━━━━━━━━━━━━━━━━━━━━━━━━━━━━━━━━ 101.5/101.5 KB 1.8 MB/s eta 0:00:00
...
Collecting MarkupSafe>=2.0
Downloading https://pypi.doubanio.com/packages/06/7f/d5e46d7464360b6ac39c5b0b604770dba937e3d7cab485d2f3298454717b/MarkupSafe-2.1.1-cp39-cp39-macosx_10_9_universal2.whl (17 kB)
Installing collected packages: zipp, MarkupSafe, itsdangerous, click, Werkzeug, Jinja2, importlib-metadata, Flask
Successfully installed Flask-2.2.2 Jinja2-3.1.2 MarkupSafe-2.1.1 Werkzeug-2.2.2 click-8.1.3 importlib-metadata-5.1.0 itsdangerous-2.1.2 zipp-3.11.0
|
Git init
with .gitignore
 1
 2
 3
 4
 5
 6
 7
 8
 9
10
11
12
13
14
| venv/
*.pyc
__pycache__/
instance/
.pytest_cache/
.coverage
htmlcov/
dist/
build/
*.egg-info/
|
Add folders
1
2
3
4
5
6
7
8
9
| $ tree -a -L 1
.
├── .git
├── .gitignore
├── flaskr
├── tests
└── venv
4 directories, 1 file
|
# Step 3. Application Setup
# The Application Factory: _init_.py
- create
Flask instance - make
flaskr directory a package
 1
 2
 3
 4
 5
 6
 7
 8
 9
10
11
12
13
14
15
16
17
18
19
20
21
22
23
24
25
26
27
28
29
30
31
32
33
34
35
36
37
38
39
| #!/usr/bin/env python
# -*- encoding: utf-8 -*-
"""
@Time : 2022/12/01 15:58:24
@Author : Linsan Yang
@Desc : init flaskr
"""
import os
from flask import Flask
def create_app(test_config=None):
# create and configure the app
app = Flask(__name__, instance_relative_config=True)
app.config.from_mapping(
SECRET_KEY = 'dev',
DATABASE=os.path.join(app.instance_path, 'flaskr.sqlite'),
)
if test_config is None:
# load the instance config, if it exists, when not testing
app.config.from_pyfile('config.py', silent=True)
else:
# load the test config if passed in
app.config.from_mapping(test_config)
# ensure the instance folder exists
try:
os.makedirs(app.instance_path)
except OSError as e:
pass
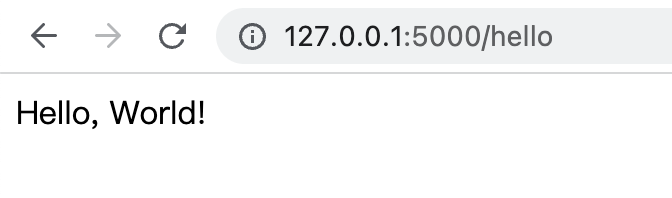
# a simple page that says hello
@app.route('/hello')
def hello():
return 'Hello, World!'
return app
|
instance folder
There will be a instance/directory, located outside the flaskr package and can hold local data that shouldn’t be committed to version control, such as configuration secrets and the database file.
test_config
Using test_config for testing.
@app.route()
create a simple route of /hello
# Run The Application
In the flask-tutorial dir not flaskr package:
1
2
3
4
5
6
7
8
9
| $ flask --app flaskr --debug run
* Serving Flask app 'flaskr'
* Debug mode: on
WARNING: This is a development server. Do not use it in a production deployment. Use a production WSGI server instead.
* Running on http://127.0.0.1:5000
Press CTRL+C to quit
* Restarting with stat
* Debugger is active!
* Debugger PIN: 134-914-837
|
Then open 127.0.0.1:5000/hello in browser, got
# Step 4. Define and Access the Database
The app will use Sqlite database to store users and posts. Python has a built-in module sqlite3 module.
# Connect to Sqlite
flaskr/db.py
 1
 2
 3
 4
 5
 6
 7
 8
 9
10
11
12
13
14
15
16
17
18
19
| import sqlite3
import click
from flask import current_app, g
def get_db():
if 'db' not in g:
g.db = sqlite3.connect(
current_app.config['DATABASE'],
detect_types=sqlite3.PARSE_DECLTYPES
)
g.db.row_factory = sqlite3.Row
return g.db
def close_db(e=None):
db = g.pop('db', None)
if db is not None:
db.close()
|
g is a spectial object for each request to share data among different functions. current_app is similar.
# Create Tables: using sql
Define user and post table in flaskr/schema.sql:
 1
 2
 3
 4
 5
 6
 7
 8
 9
10
11
12
13
14
15
16
17
| DROP TABLE IF EXISTS user;
DROP TABLE IF EXISTS post;
CREATE TABLE user (
id INTEGER PRIMARY KEY AUTOINCREMENT,
username TEXT UNIQUE NOT NULL,
password TEXT NOT NULL
);
CREATE TABLE post (
id INTEGER PRIMARY KEY AUTOINCREMENT,
author_id INTEGER NOT NULL,
created TIMESTAMP NOT NULL DEFAULT CURRENT_TIMESTAMP,
title TEXT NOT NULL,
body TEXT NOT NULL,
FOREIGN KEY (author_id) REFERENCES user (id)
);
|
Add functions to run the SQLs to the db.py
 1
 2
 3
 4
 5
 6
 7
 8
 9
10
11
| def init_db():
db = get_db()
with current_app.open_resource('schema.sql') as f:
db.executescript(f.read().decode('utf8'))
@click.command('init-db')
def init_db_command():
'''Clear the existing data and create new tables.'''
init_db()
click.echo('Initialized the database.')
|
# Register with the Applicaiton
The close_db and init_db_command functions need to be registered with the app instance for use.
In db.py add a new init_app function:
1
2
3
4
5
| def init_app(app):
# tells Flask to call that function when cleaning up after returning the response
app.teardown_appcontext(close_db)
# adds a new command that can be called with the flask command
app.cli.add_command(init_db_command)
|
Then import and call this function from the factory in __init__.py.
 1
 2
 3
 4
 5
 6
 7
 8
 9
10
| def create_app(test_config=None):
# create and configure the app
app = ...
# existing code omitted
# add db functions
from . import db
db.init_app(app)
return app
|
# Initialize the Database
Now use init-dbcommand like this:
1
2
3
4
5
6
7
8
| $ flask --app flaskr init-db
Initialized the database.
$ tree instance/
instance/
└── flaskr.sqlite
0 directories, 1 file
|
The command generates a sqlite db file flaskr.sqlite in instance/ dir.
# Step 5. Blueprints and Views
Referances:
Blueprints and Views
Use a Flask Blueprint to Architect Your Applications
Concept: view
A view is Flask’s respond to the outgoing request. Flask uses patterns to match the incoming request URL to the view that should handle it.
Concept: blueprint
A blueprint is a way to organize a group of related views and other code. Rather than registering views and other code directly with an application, they are registered with a blueprint. Then the blueprint is registered with the application when it is available in the factory function.
# Create a Blueprint
Flaskr will have two blueprints:
- auth functions
- blog posts functions
Flaskr/auth.py
1
2
3
4
5
6
7
8
9
| import functools
from flask import (
Blueprint, flash, g, redirect, render_template, request, session, url_for
)
from werkzeug.security import check_password_hash, generate_password_hash
from flaskr.db import get_db
bp = Blueprint('auth', __name__, url_prefix='/auth')
|
A new Blueprint is created:
- with
name: ‘auth’ - with
import_name: ‘_name_’, helping the blueprint to know where it’s defined - with
url_prefix: will be prepended (added at head)to all the URLs associated with this blueprint.
Then register the blueprint to the app from the factory in the __init__.py
 1
 2
 3
 4
 5
 6
 7
 8
 9
10
11
| def create_app(test_config=None):
# create and configure the app
app = ...
# existing code omitted
# add auth blueprint
from . import auth
app.register_blueprint(auth.bp)
return app
|
Referances:
Python functools
# Register view
When the user visits the /auth/register URL, the register view will return
HTML with a form for them to fill out. When they submit the form, it will validate their input and either show the form again with an error message or create the new user and go to the login page.
The view code is as following in flaskr/auth.py
 1
 2
 3
 4
 5
 6
 7
 8
 9
10
11
12
13
14
15
16
17
18
19
20
21
22
23
24
25
26
27
28
| @bp.route('/register', methods=('GET', 'POST'))
def register():
if request.method == 'POST':
username = request.form['username']
password = request.form['password']
db = get_db()
error = None
if not username:
error = 'Username is required.'
elif not password:
error = 'Password is required.'
if error is None:
try:
db.execute(
'INSERT INTO user (username, password) VALUES (?, ?)',
(username, generate_password_hash(password))
)
db.commit()
except db.IntegrityError:
error = f"User {username} is already registered."
else:
return redirect(url_for('auth.login'))
flash(error)
return render_template('auth/register.html')
|
The register view works as following:
- @bp.route associates the URL
/register with the register view. - If the user submited the register form,
request.method == 'POST', then validate the input username and password and store them into the database. - If storing the user info succeeds, then redirect to the
auth.login page. - If the user is initially landing on the
register page, or there was a validation error, the register.html will be shown.
# Login view
This view follows the same pattern as register view.
 1
 2
 3
 4
 5
 6
 7
 8
 9
10
11
12
13
14
15
16
17
18
19
20
21
22
23
24
25
| @bp.route('/login', methods=('GET', 'POST'))
def login():
if request.method == 'POST':
username = request.form['username']
password = request.form['password']
db = get_db()
error = None
user = db.execute(
'SELECT * FROM user WHERE username = ?', (username,)
).fetchone()
if user is None:
error = 'Incorrect username.'
elif not check_password_hash(user['password'], password):
error = 'Incorrect password.'
if error is None:
session.clear()
session['user_id'] = user['id']
return redirect(url_for('index'))
flash(error)
return render_template('auth/login.html')
|
Tips:
- The user info is queried and stored in
user variable using fetch_one function. - Validate the
username and password (by check_password_hash) inputs. - The
session (a dict storing data across requests) refreshes if login succeeds. (The data is stored in a cookie that is sent to the browser, and the browser then sends it back with subsequent requests.)
We can get user info at the beginning of each request via session:
 1
 2
 3
 4
 5
 6
 7
 8
 9
10
| @bp.before_app_request
def load_logged_in_user():
user_id = session.get('user_id')
if user_id is None:
g.user = None
else:
g.user = get_db().execute(
'SELECT * FROM user WHERE id = ?', (user_id,)
).fetchone()
|
Tips:
bp.before_app_request() registers a function that runs before the view function, no matter what URL is requested.load_logged_in_user gets that user info from the database via session and stores it on
g.user, which lasts for the length of the request.
# Logout view
The Logout view removes the user id from the
session.
1
2
3
4
| @bp.route('/logout')
def logout():
session.clear()
return redirect(url_for('index'))
|
# Require Auth in Other views
Creating, editing and deleting blog posts requires the user to be logged in. Use a decorator to achieve this.
1
2
3
4
5
6
7
8
9
| def login_required(view):
@functools.wraps(view)
def wrapped_view(**kwargs):
if g.user is None:
return redirect(url_for('auth.login'))
return view(**kwargs)
return wrapped_view
|
This decorator wraps the view in this way: if a user is not logged in, then redirect to login page; if logged in, return the orginal view.
# Step 6. Templates
Though auth.login view has been created, a TemplateNotFound error will be raised when you visit http://127.0.0.1:5000/auth/login.
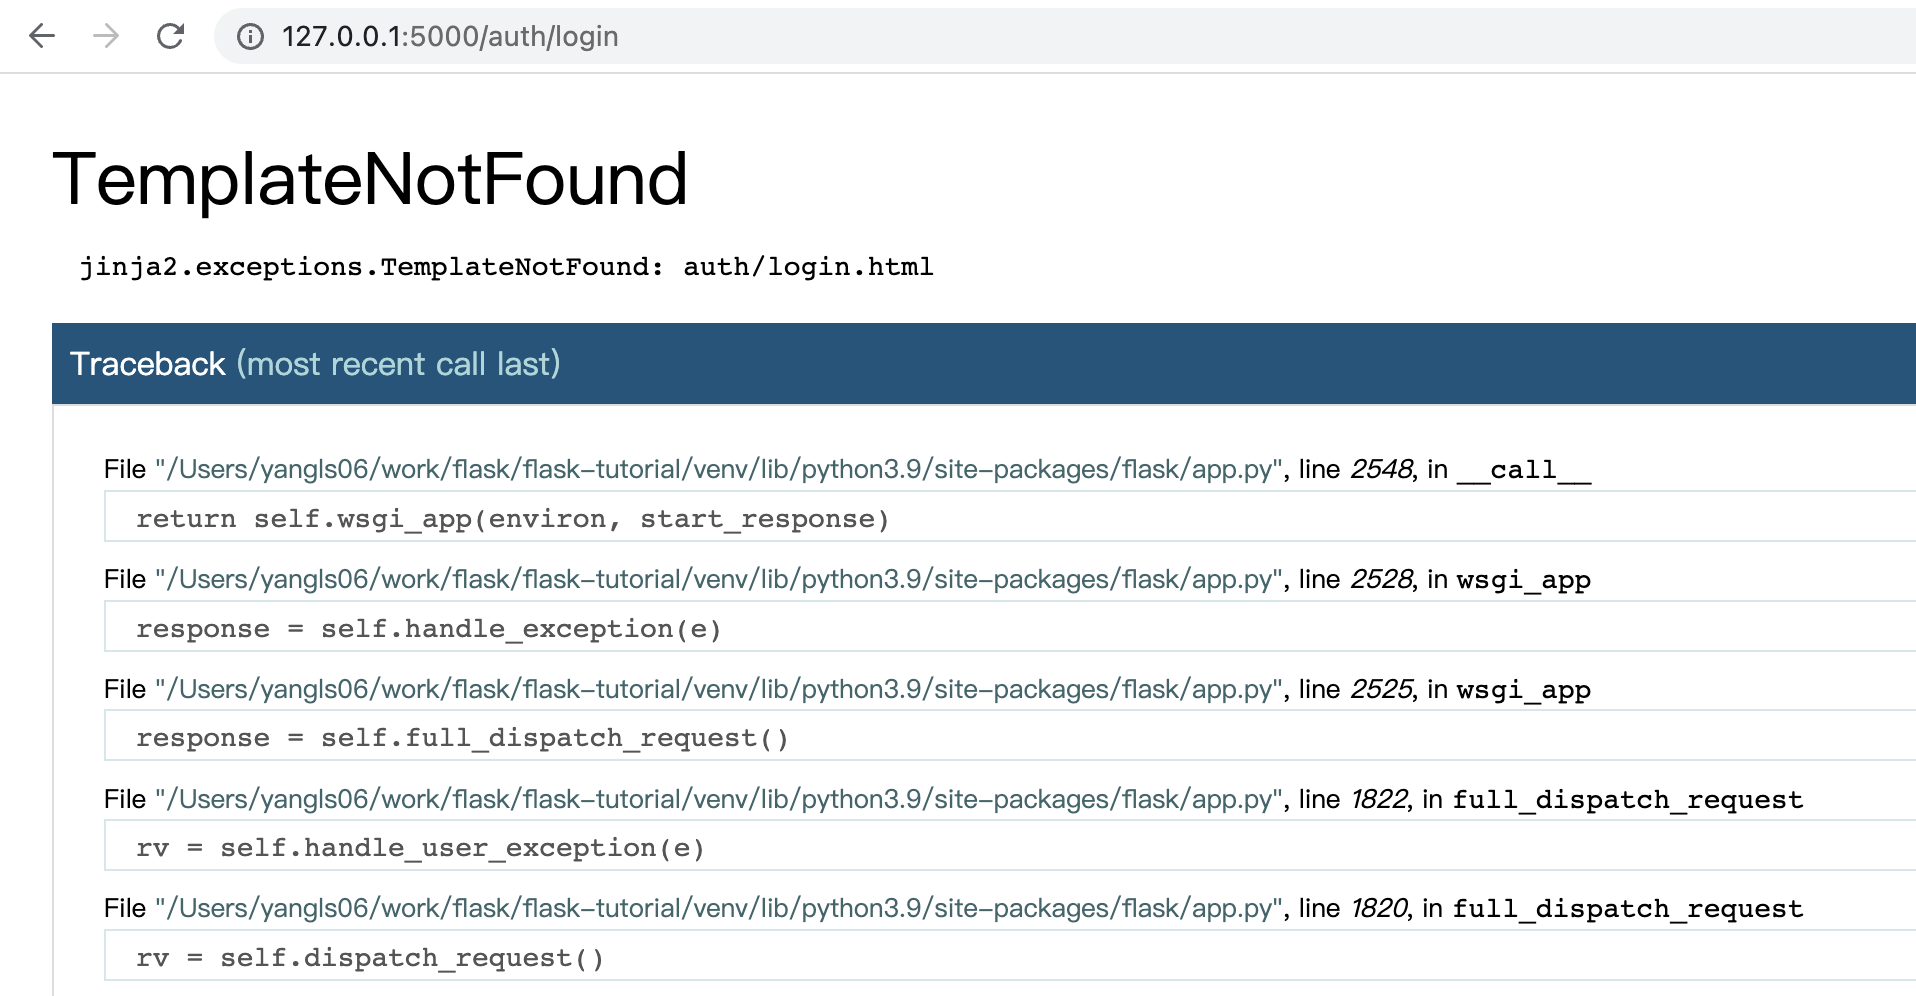
This is because the view calls render_template(), but no templates are created.
Tips:
- The template files will be stored in the
templates directory inside the flaskr package. - Templates are files that contain static data as well as placeholders for dynamic data.
- A template is rendered with specific data to produce a final document. Flask uses the
Jinja template library to render templates.
- Special delimiters are used to distinguish Jinja syntax from the static data in the template.
- Anything between
{{ and }} is an expression that will be output to the final document. {% and %} denotes a control flow statement like if and for
# The Base Layout
Each page in the app has the same basic layout around a different body.Instead of writing the entire HTML structure in each template, each template will extend a base template and override specific sections.
File: flaskr/templates/base.html
 1
 2
 3
 4
 5
 6
 7
 8
 9
10
11
12
13
14
15
16
17
18
19
20
21
22
23
24
25
26
27
28
| <!DOCTYPE html>
<title>{% block title %}{% endblock %} - Flaskr</title>
<link rel="stylesheet" href="{{ url_for('static', filename='style.css') }}">
<nav>
<h1>Flaskr</h1>
<ul>
{% if g.user %}
<li><span>{{ g.user['username'] }}</span></li>
<li><a href="{{ url_for('auth.logout') }}">Log Out</a></li>
{% else %}
<li><a href="{{ url_for('auth.register') }}">Register</a></li>
<li><a href="{{ url_for('auth.login') }}">Log <Input:c></Input:c></a></li>
{% endif %}
</ul>
</nav>
<section class="content">
<header>
{% block header %}
{% endblock %}
</header>
{% for message in get_flashed_messages() %}
<div class="flash">{{ message }}</div>
{% endfor %}
{% block content %}
{% endblock %}
</section>
|
Notes: Using Jinja Snippets and HTML CSS Support extensions in vscode is helpful to write html code of Jinja templates.
There are three blocks defined here that will be overridden in the other templates:
{% block title %} will change the title displayed in the browser’s tab and window title.{% block header %} is similar to title but will change the title displayed on the page.{% block content %} is where the content of each page goes, such as the login form or a blog post.
The base template is directly in the templates directory. To keep the others organized, the templates for a blueprint will be placed in a directory with the same name as the blueprint.
# Register template
File: flaskr/templates/register.html
 1
 2
 3
 4
 5
 6
 7
 8
 9
10
11
12
13
14
15
| {% extends 'base.html' %}
{% block header %}
<h1>{% block title %}Register{% endblock %}</h1>
{% endblock %}
{% block content %}
<form method="post">
<label for="username">Username</label>
<input name="username" id="username" required>
<label for="password">Password</label>
<input type="password" name="password" id="password" required>
<input type="submit" value="Register">
</form>
{% endblock %}
|
# Log In template
This is identical to the register template except for the title and submit button.
 1
 2
 3
 4
 5
 6
 7
 8
 9
10
11
12
13
14
15
| {% extends 'base.html' %}
{% block header %}
<h1>{% block title %}Log In{% endblock %}</h1>
{% endblock %}
{% block content %}
<form method="post">
<label for="username">Username</label>
<input name="username" id="username" required>
<label for="password">Password</label>
<input type="password" name="password" id="password" required>
<input type="submit" value="Log In">
</form>
{% endblock %}
|
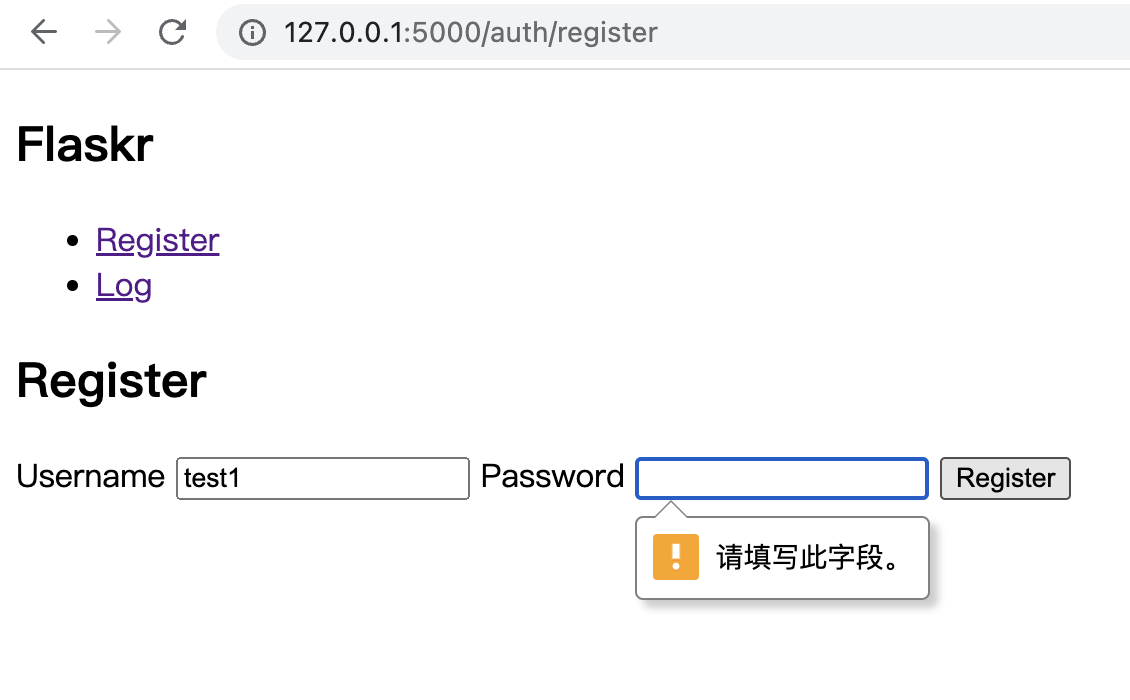
# Register a user
Visit http://127.0.0.1:5000/auth/register

If no password inputed, you will see:
If register succeeds, it will redirect to login page:
If incorrect password is inputed, you will get Incorrect password warning:

# Step 7. Static Files
Use css file in the flask/static directory to give the webpages some style. In the base.html template there is already a link to style.css file.
1
| {{ url_for('static', filename='style.css') }}
|
File: flask/static/style.css
 1
 2
 3
 4
 5
 6
 7
 8
 9
10
11
12
13
14
15
16
17
18
19
20
21
22
23
24
25
26
| html { font-family: sans-serif; background: #eee; padding: 1rem; }
body { max-width: 960px; margin: 0 auto; background: white; }
h1 { font-family: serif; color: #377ba8; margin: 1rem 0; }
a { color: #377ba8; }
hr { border: none; border-top: 1px solid lightgray; }
nav { background: lightgray; display: flex; align-items: center; padding: 0 0.5rem; }
nav h1 { flex: auto; margin: 0; }
nav h1 a { text-decoration: none; padding: 0.25rem 0.5rem; }
nav ul { display: flex; list-style: none; margin: 0; padding: 0; }
nav ul li a, nav ul li span, header .action { display: block; padding: 0.5rem; }
.content { padding: 0 1rem 1rem; }
.content > header { border-bottom: 1px solid lightgray; display: flex; align-items: flex-end; }
.content > header h1 { flex: auto; margin: 1rem 0 0.25rem 0; }
.flash { margin: 1em 0; padding: 1em; background: #cae6f6; border: 1px solid #377ba8; }
.post > header { display: flex; align-items: flex-end; font-size: 0.85em; }
.post > header > div:first-of-type { flex: auto; }
.post > header h1 { font-size: 1.5em; margin-bottom: 0; }
.post .about { color: slategray; font-style: italic; }
.post .body { white-space: pre-line; }
.content:last-child { margin-bottom: 0; }
.content form { margin: 1em 0; display: flex; flex-direction: column; }
.content label { font-weight: bold; margin-bottom: 0.5em; }
.content input, .content textarea { margin-bottom: 1em; }
.content textarea { min-height: 12em; resize: vertical; }
input.danger { color: #cc2f2e; }
input[type=submit] { align-self: start; min-width: 10em; }
|
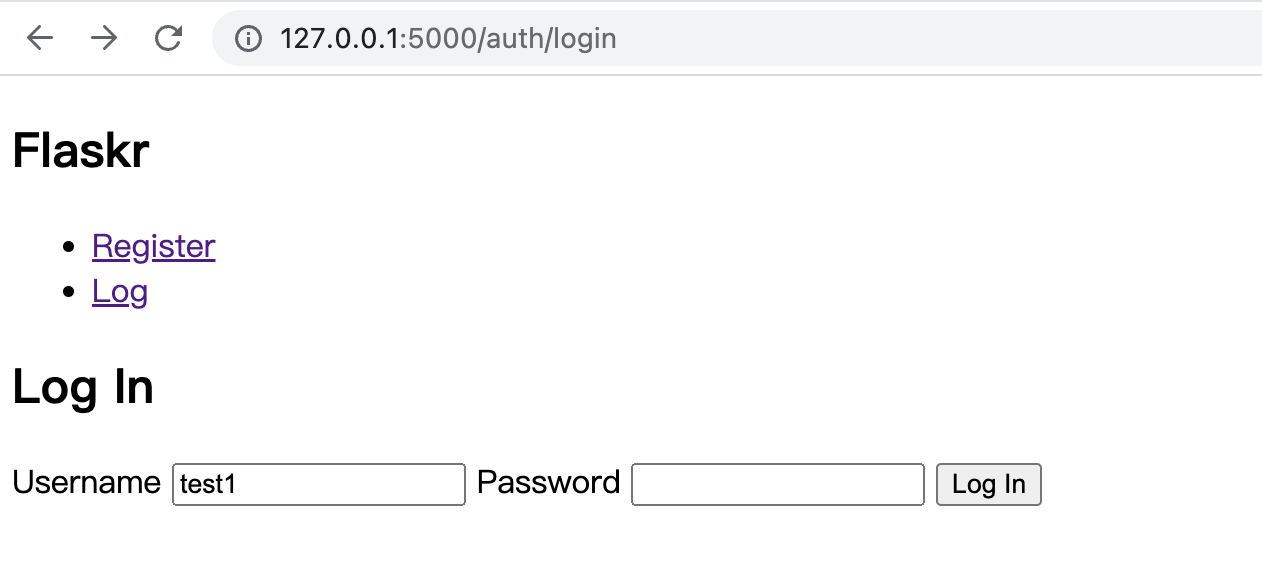
After that, reload the login page, and you can see:

# Step 8. Blog Blueprint
Implement the blog blueprint to allow a logged-in user to create posts and edit/delete the posts of his/her own.
Note: As you implement each view, keep the development server running. As you save your changes, try going to the URL in your browser and testing them out.
# The Blog Blueprint
Define blog blueprint in file: flask/blog.py
1
2
3
4
5
6
7
8
9
| from flask import (
Blueprint, flash, g, redirect, render_template, request, session, url_for
)
from werkzeug.exceptions import abort
from flaskr.db import get_db
from flaskr.auth import login_required
bp = Blueprint('auth', __name__)
|
Register this blueprint in the app factory in file : flask/__init__.py
 1
 2
 3
 4
 5
 6
 7
 8
 9
10
11
| def create_app(test_config=None):
# create and configure the app
app = ...
# existing code omitted
# add blog blueprint
from . import blog
app.register_blueprint(blog.bp)
app.add_url_rule('/', endpoint='index')
return app
|
Unlike the auth blueprint, the blog blueprint does not have a url_prefix. So the index view will be at /, the create view at /create. The blog is the main feature of Flaskr app, so it makes sense that the blog index will be the main index.
The endpoint for index view in blog blueprint will be blog.index. The app.add_url_rule('/', endpoint='index') code associates the endpoint name ‘index’ with the / url so that url_for('index') or url_for('blog.index') will both work, generating the same / URL either way.
# Index: view and template
The index view shows all the posts of the logged-in user, order by created time desc. Use SQL’s JOIN clause.
Define index view in file: flaskr/blog.py:
1
2
3
4
5
6
7
8
9
| @bp.route('/')
def index():
db = get_db()
posts = db.execute(
'SELECT p.id, title, body, created, author_id, username'
' FROM post p JOIN user u ON p.author_id = u.id'
' ORDER BY created DESC'
).fetchall()
return render_template('blog/index.html', posts=posts)
|
Define index template in file: flaskr/templates/index.html:
 1
 2
 3
 4
 5
 6
 7
 8
 9
10
11
12
13
14
15
16
17
18
19
20
21
22
23
24
25
26
27
| {% extends 'base.html' %}
{% block header %}
<h1>{% block title %}Posts{% endblock %}</h1>
{% if g.user %}
<a class="action" href="{{ url_for('blog.create') }}" >New</a>
{% endif %}
{% endblock %}
{% block content %}
{% for post in posts %}
<article class="post">
<header>
<div>
<h1>{{ post['title'] }}</h1>
<div class="about">by {{ post['username'] }} on {{ post['created'].strftime('%Y-%m-%d') }}</div>
</div>
{% if g.user['id'] == post['author_id'] %}
<a class="action" href="{{ url_for('blog.update', id=post['id']) }}">Edit</a>
{% endif %}
</header>
</article>
{% if not loop.last %}
<hr>
{% endif %}
{% endfor %}
{% endblock %}
|
Tips:
- when a user is logged in, the
header block adds a link to the create view. - when the user is the author of a post, an
Edit link to the update view will be seen. loop.last is a special variable of Jinja’s loop.
# Create: view and template
The blog.create view acts the similar way as auth.register view.
Define blog.create view in file: flaskr/blog.py:
 1
 2
 3
 4
 5
 6
 7
 8
 9
10
11
12
13
14
15
16
17
18
19
20
21
22
23
24
| @bp.route('/create', methods=('GET', 'POST'))
@login_required
def create():
if request.method == 'POST':
title = request.form['title']
body = request.form['body']
error = None
if not title:
error = 'Title is requested.'
if error is not None:
flash(error)
else:
db = get_db()
db.execute(
'INSERT INTO post (title, body, author_id)'
' VALUES (?, ?, ?)',
(title, body, g.user['id'])
)
db.commit()
return redirect(url_for('blog.index'))
return render_template('blog/create.html')
|
Tips:
- if a new post is POSTed, add it into the database.
- Or display the form of creating post in the
create template. - Login_required decorator is used here to insure the user is logged-in before a new post is created.
Define the create template in file: flaskr/templates/blog/create.html
 1
 2
 3
 4
 5
 6
 7
 8
 9
10
11
12
13
14
15
| {% extends 'base.html' %}
{% block header %}
<h1>{% block title %}New Post{% endblock %}</h1>
{% endblock %}
{% block content %}
<form method="POST">
<label for="title">Title</label>
<input name="title" id="title" value="{{ request.form['title'] }}" required>
<label for="body">Body</label>
<textarea name="body" id="body">{{ request.form['body'] }}</textarea>
<input type="submit" value="Save">
</form>
{% endblock %}
|
# Update: view and template
Write a get_post() function to fetch a post by id and check if the author equals the logged in user. This function will be used in update and delete view.
Define get_post() function in file: flaskr/blog.py:
 1
 2
 3
 4
 5
 6
 7
 8
 9
10
11
12
13
14
15
| def get_post(id, check_author=True):
post = get_db().execute(
'SELECT p.id, title, body, created, author_id, user_name'
' FROM post p JOIN user u ON p.author_id=u.id'
' WHERE p.id = ?',
(id,)
).fetchone()
if post is None:
abort(404, f'Post id {id} does not exist.')
if check_author and post['author_id'] != g.user['id']:
abort(403)
return post
|
Tips:
abort() will raise a exception that returns an HTTP status code like 404 (Not Found) or 403 (Forbidden).
Define update view in file: flaskr/blog.py:
 1
 2
 3
 4
 5
 6
 7
 8
 9
10
11
12
13
14
15
16
17
18
19
20
21
22
23
24
25
26
27
|
@bp.route('/<int:id>/update', methods=('GET', 'POST'))
@login_required
def update(id):
    post = get_post(id)

    if request.method == 'POST':
        title = request.form['title']
        body = request.form['body']
        error = None

        if not title:
            error = 'Title is required.'

        if error is not None:
            flash(error)
        else:
            db = get_db()
            db.execute(
                'UPDATE post SET title = ?, body = ?'
                ' WHERE id = ?',
                (title, body, id)
            )
            db.commit()
            return redirect(url_for('blog.index'))

    return render_template('blog/update.html', post=post)
|
Tips:
update view takes an argument id , which corresponds to the <int:id> in the route. A real URL will look like /1/update. And the url_for() function also needs to be passed the id argument in the way of url_for('blog.update', id=post['id']).
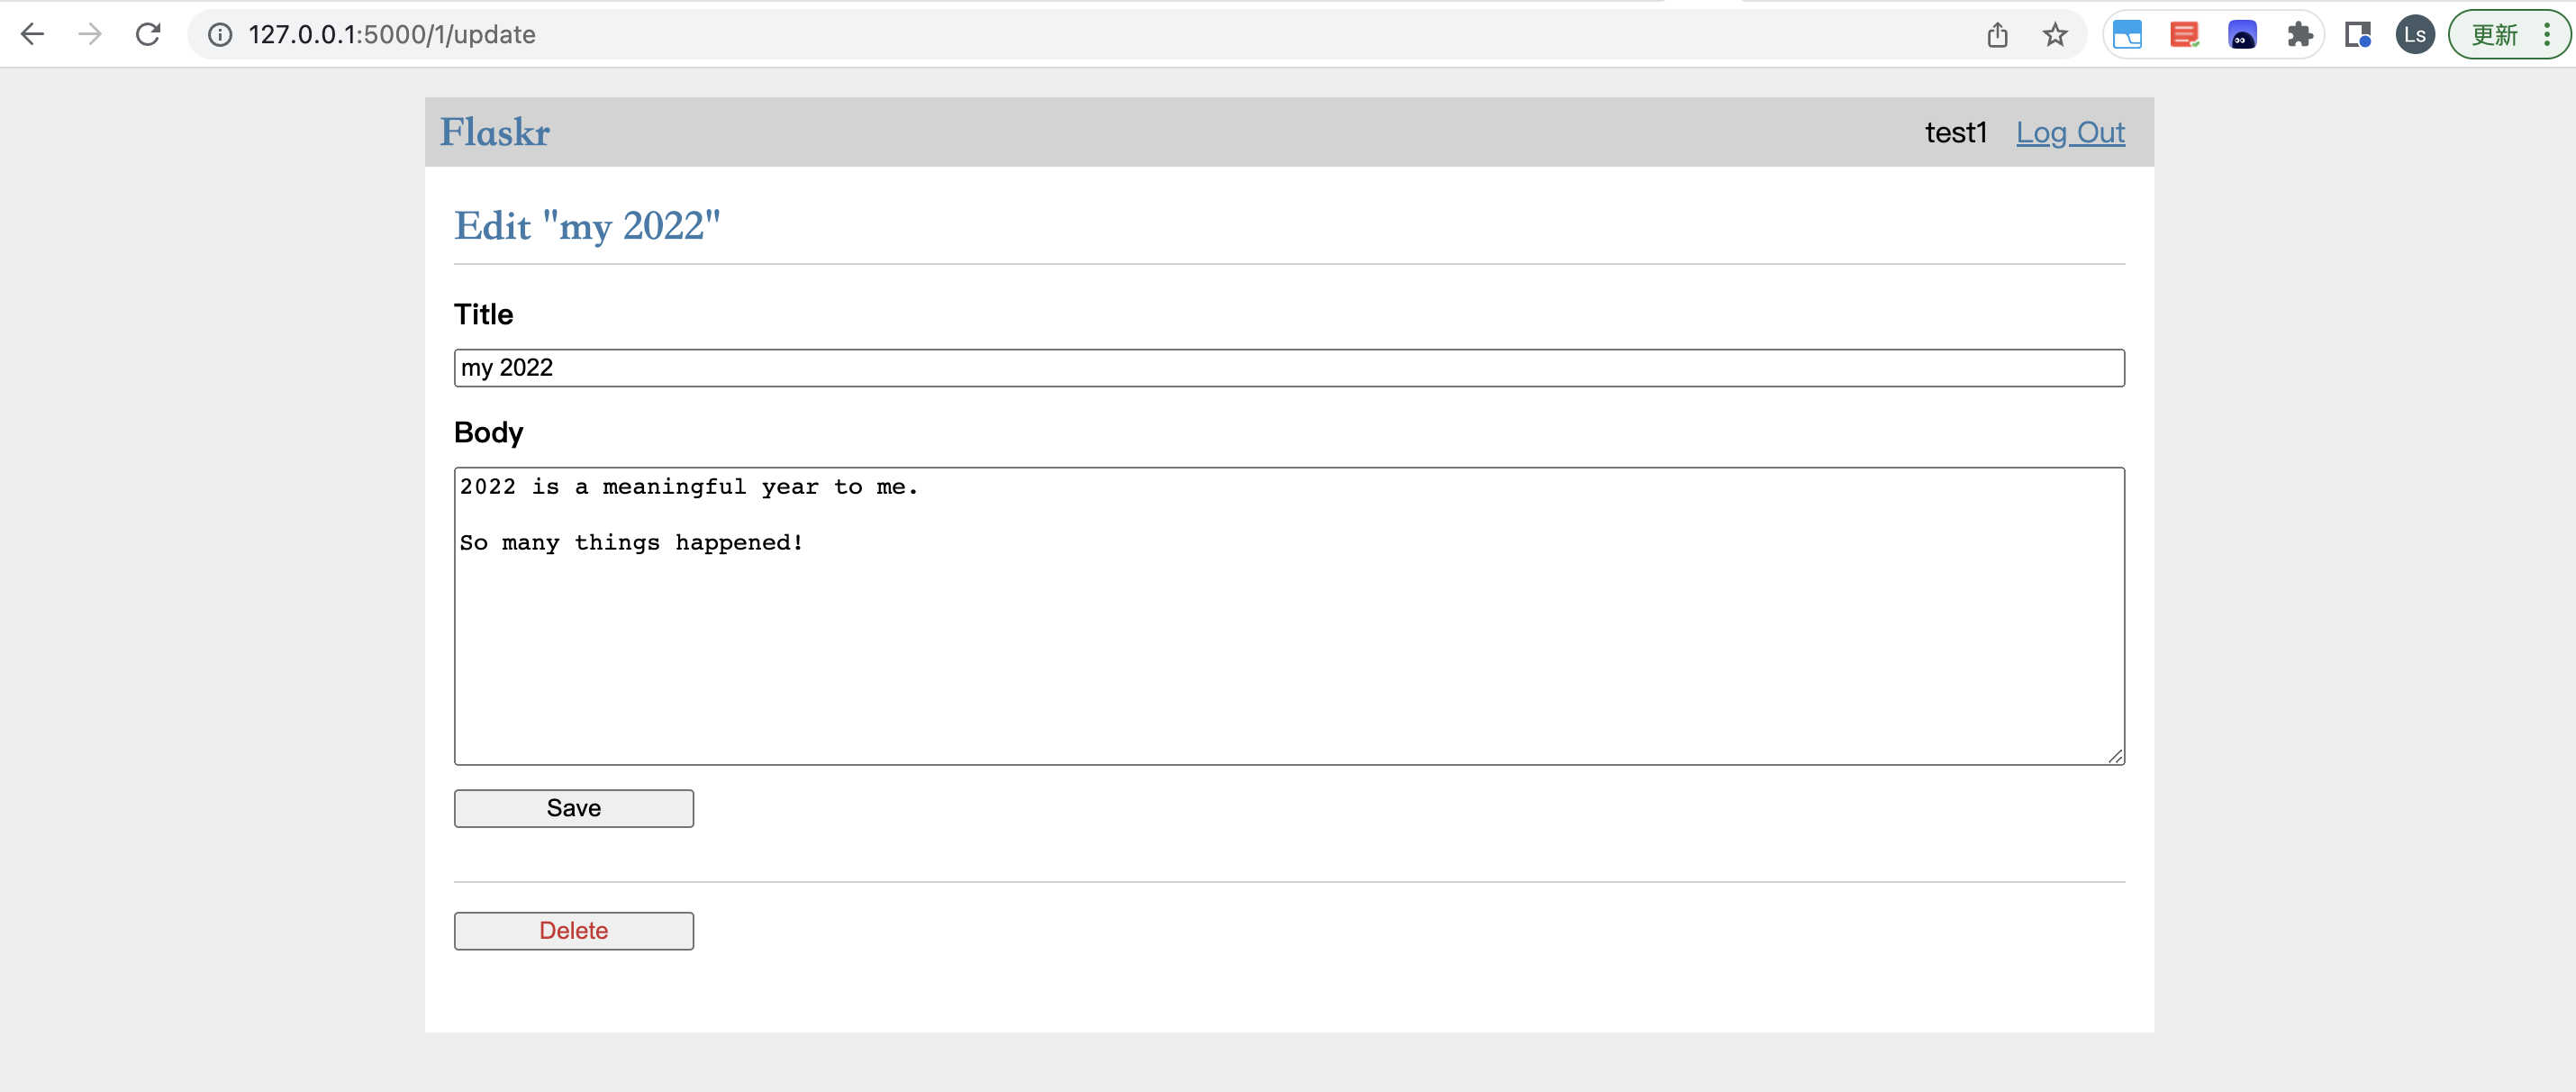
Define the update template in file: flaskr/templates/blog/update.html
 1
 2
 3
 4
 5
 6
 7
 8
 9
10
11
12
13
14
15
16
17
18
19
| {% extends 'base.html' %}
{% block header %}
<h1>{% block title %}Edit "{{ post['title'] }}"{% endblock %}</h1>
{% endblock %}
{% block content %}
<form method="POST">
<label for="title">Title</label>
<input name="title" id="title" value="{{ request.form['title'] or post['title'] }}" required>
<label for="body">Body</label>
<textarea name="body" id="body">{{ request.form['body'] or post['body'] }}</textarea>
<input type="submit" value="Save">
</form>
<hr>
<form action="{{ url_for('blog.delete', id=post['id']) }}" method="post">
<input type="submit" value="Delete" class="danger" onclick="return confirm('Are you sure?');">
</form>
{% endblock %}
|
Tips:
- This templates has two forms:
- The first one to edit the current post(
/<id>/update) - The other one to delete the post
- The pattern
{{ request.form['title'] or post['title'] }} is used to choose what data appears in the form.- When the form hasn’t been submitted, the original
post data appears - but if invalid form data was posted you want to display that so the user can fix the error, so
request.form is used instead.
# Delete: view
The delete view has no template. Define it:
1
2
3
4
5
6
7
8
| @bp.route('/<int:id>/delete', methods=('POST',))
@login_required
def delete(id):
get_post(id)
db = get_db()
db.execute('DELETE FROM post WHERE id = ?', (id,))
db.commit()
return redirect(url_for('blog.index'))
|
Now all code are finished. Try it!
log in

Log out

Create a post

Writing

saved

edit
Great!
# Step 9. Make the Project Installable
# Describe the Project
In order to make the project Installabe, write a setup.py file to describe the project and its dependencies.
 1
 2
 3
 4
 5
 6
 7
 8
 9
10
11
12
| from setuptools import find_packages, setup
setup(
name='flaskr',
version='1.0.0',
description='a simple blog post app based on Flask',
packages=find_packages(),
include_package_data=True,
requires=[
'flask'
]
)
|
Tips:
packages tells Python what package directories to include, and find_packages() function finds them automatically.- To include other files, such as the static and templates directories,
include_package_data is set. requires tells what modules need to be installed as the project’s dependencies.- Python needs another file named
MANIFEST.in to tell what this other data is.
File MANIFEST.in
1
2
3
4
| include flaskr/schema.sql
graft flaskr/static
graft flaskr/templates
global-exclude *.pyc
|
This tells Python to copy everything in the static and templates directories, and the schema.sql file, but to exclude all bytecode files.
# Install the Project
Use pip to install your project in the virtual environment.
1
2
3
4
5
6
7
| $ pip install -e .
Looking in indexes: https://pypi.douban.com/simple
Obtaining file:///Users/yangls06/work/flask/flask-tutorial/flaskr
Preparing metadata (setup.py) ... done
Installing collected packages: flaskr
Running setup.py develop for flaskr
Successfully installed flaskr-1.0.0
|
This tells pip to find setup.py in the current directory and install it in editable or development mode.
Editable mode means that as you make changes to your local code, you’ll only need to re-install if you change the metadata about the project, such as its dependencies.
You can observe that the project is now installed with pip list.
 1
 2
 3
 4
 5
 6
 7
 8
 9
10
11
12
13
14
| $ pip list
Package Version Editable project location
------------------ ------- ------------------------------------------------
click 8.1.3
Flask 2.2.2
flaskr 1.0.0 /Users/yangls06/work/flask/flask-tutorial/flaskr
importlib-metadata 5.1.0
itsdangerous 2.1.2
Jinja2 3.1.2
MarkupSafe 2.1.1
pip 22.3.1
setuptools 58.1.0
Werkzeug 2.2.2
zipp 3.11.0
|
Nothing changes from how you’ve been running your project so far. --app is still set to flaskr and flask run still runs the application, but you can call it from anywhere, not just the flask-tutorial directory.